
Officer Madga[]
")
Magda aboard the Silent Mary. (DMTNT)
")
Magda and the rest of the crew prepare to fire on the surviving pirates. (DMTNT)
")
Magda aboard the Monarch. (DMTNT)
")
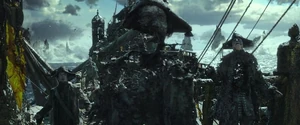
The crew is finally free. (DMTNT)
")
Magda looking at Salazar. (DMTNT)
")
The battle aboard the Black Pearl. (DMTNT)
")
Magda at the helm. (DMTNT)
")
Magda in ghost form. (DMTNT)
")
The crew running for the anchor of the Black Pearl in one last attempt to finally be free. (DMTNT)
")
Magda fails to reach the anchor in time. (DMTNT)
")
Rodney Afif in costume as Madga. (On-set)
")
Rodney Afif in costume as Madga. (On-set)
")
LEGO Minifigure of Magda. (Merch)
")
LEGO Magda holding a mop. (
Officer Moss[]
")
Moss aboard the Silent Mary. (DMTNT)
Moss and the rest of the crew prepare to fire on the surviving pirates. (DMTNT)
")
Moss with another soldier aboard the Monarch. (DMTNT)
The crew is finally free. (DMTNT)
")
Moss aboard the Mary. (DMTNT)
")
Moss during the explosion. (DMTNT)
The battle aboard the Black Pearl. (DMTNT)
")
Moss shouts to his crewmates. (DMTNT)
")
Moss shouts to his crewmates. (DMTNT)
The crew running for the anchor of the Black Pearl in one last attempt to finally be free. (DMTNT)
")
Stephen Lopez on set as Moss alongside Juan Carlos Vellido, Ruipert Raineri, Helder Fernandes and Nico Cortez. (On-set)
")
Stephen Lopez on set as Moss alongside Ruipert Raineri, Juan Carlos Vellido and Nico Cortez. (On-set)
")
Stephen Lopez in costume as Moss alongside Juan Carlos Vellido, Ruipert Raineri and Nico Cortez. (On-set)
")
Stephen Lopez in costume as Moss. (On-set)
")
Stephen Lopez partly in costume as Moss. (On-set)
Officer Santos[]
")
Santos aboard the Silent Mary. (DMTNT)
Santos and the rest of the crew prepare to fire on the surviving pirates. (DMTNT)
The crew is finally free. (DMTNT)
")
Santos in awe at the sight of daylight. (DMTNT)
")
Santos running. (DMTNT)
")
Santos aboard the Mary. (DMTNT)
The battle aboard the Black Pearl. (DMTNT)
")
Santos holding a sword to Henry's throat. (DMTNT)
The crew running for the anchor of the Black Pearl in one last attempt to finally be free. (DMTNT)
")
Rupert Raineri on set during filming aboard the Black Pearl. (On-set)
Rupert Raineri on set as Santos alongside Juan Carlos Vellido, Stephen Lopez, Helder Fernandes and Nico Cortez. (On-set)
Rupert Raineri on set as Santos alongside Stephen Lopez, Juan Carlos Vellido and Nico Cortez. (On-set)
Rupert Raineri in costume as Santos alongside Stephen Lopez, Juan Carlos Vellido and Nico Cortez. (On-set)
")
Rupert Raineri in costume as Santos. (On-set)
")
Rupert Raineri in costume as Santos. (On-set)
")
Rupert Raineri in costume as Santos. (On-set)
")
Rupert Raineri in costume as Santos. (On-set)
")
LEGO Minifigure of Santos. (Merch)
")
LEGO Santos with a flintlock. (Merch)
Silent Mary Officer[]
")
The officer aboard the Silent Mary. (DMTNT)
The officer and the rest of the crew prepare to fire on the surviving pirates. (DMTNT)
The crew is finally free. (DMTNT)
")
The officer executing a pirate. (DMTNT)
")
The officer about to fire a cannon at Jack Sparrow. (DMTNT)
The battle aboard the Black Pearl. (DMTNT)
")
The officer talking with Lesaro and Salazar. (DMTNT)
")
The officer cheering with Lesaro. (DMTNT)
The crew running for the anchor of the Black Pearl in one last attempt to finally be free. (DMTNT)
Nico Cortez on set as the officer with Stephen Lopez, Juan Carlos Vellido and Rupert Raineri.(On-set)
Nico Cortez on set as the officer with Juan Carlos Vellido, Stephen Lopez, Rupert Raineri and Helder Fernandes. (On-set)
Nico Cortez in costume along with Stephen Lopez, Juan Carlos Vellido and Rupert Raineri. (On-set)
Silent Mary Officer 2[]
The officer and the rest of the crew prepare to fire on the surviving pirates. (DMTNT)
")
The officer aboard the Queen Anne's Revenge. (DMTNT)
The crew is finally free. (DMTNT)
")
The officer executing a pirate. (DMTNT)
The battle aboard the Black Pearl. (DMTNT)
")
The officer turns to dust. (DMTNT)
Silent Mary Sailor 1[]
The crew is finally free. (DMTNT)
.jpg "Helder Fernandes (2).jpg (15 KB)")
The sailor at Hangman's bay. (DMTNT)
The battle aboard the Black Pearl. (DMTNT)
The crew running for the anchor of the Black Pearl in one last attempt to finally be free. (DMTNT)
")
The sailor climbing after Salazar. (DMTNT)
Helder Fernandes on set as the sailor along with Juan Carlos Vellido, Stephen Lopez, Rupert Raineri and Nico Cortez. (On-set)
Silent Mary Sailor 2[]
The soldier and the rest of the crew prepare to fire on the surviving pirates. (DMTNT)
")
The soldier aboard the Silent Mary. (DMTNT)
The crew is finally free. (DMTNT)
The battle aboard the Black Pearl. (DMTNT)
The sailor (left) at the helm with Magda. (DMTNT)
")
The soldiers grabbing Jack. (DMTNT)
Silent Mary Soldier 1[]
")
The soldier aboard the Silent Mary. (DMTNT)
The soldier and the rest of the crew prepare to fire on the surviving pirates. (DMTNT)
The crew is finally free. (DMTNT)
The battle aboard the Black Pearl. (DMTNT)
The crew running for the anchor of the Black Pearl in one last attempt to finally be free. (DMTNT)
Silent Mary Soldier 2[]
The soldier and the rest of the crew prepare to fire on the surviving pirates. (DMTNT)
")
The soldier aboard the Silent Mary. (DMTNT)
The crew is finally free. (DMTNT)
")
The soldier at Hangman's bay. (DMTNT)
")
The soldier turning to dust. (DMTNT)
Silent Mary Soldier 3[]
The soldier and the rest of the crew prepare to fire on the surviving pirates. (DMTNT)
")
The soldier aboard the Monarch. (DMTNT)
The soldier (left) with Officer Moss. (DMTNT)
The crew is finally free. (DMTNT)
The battle aboard the Black Pearl. (DMTNT)
The crew running for the anchor of the Black Pearl in one last attempt to finally be free. (DMTNT)
Silent Mary Soldier 4[]
The soldier and the rest of the crew prepare to fire on the surviving pirates. (DMTNT)
")
The soldier aboard the Monarch. (DMTNT)
The crew is finally free. (DMTNT)
")
The soldier fascinated by daylight. (DMTNT)
")
The soldier threatening Barbossa. (DMTNT)
The battle aboard the Black Pearl. (DMTNT)
The crew running for the anchor of the Black Pearl in one last attempt to finally be free. (DMTNT)
Silent Mary Soldier 5[]
The soldier and the rest of the crew prepare to fire on the surviving pirates. (DMTNT)
The crew is finally free. (DMTNT)
The battle aboard the Black Pearl. (DMTNT)
")
The soldier aboard the Queen Anne's Revenge. (DMTNT)
")
The soldier threatening a pirate. (DMTNT)
The crew running for the anchor of the Black Pearl in one last attempt to finally be free. (DMTNT)
Group images[]
")
")
")
")
")
")
")
")
")
")
")
")
")
")
")
")
")
")
")
")
")
")